

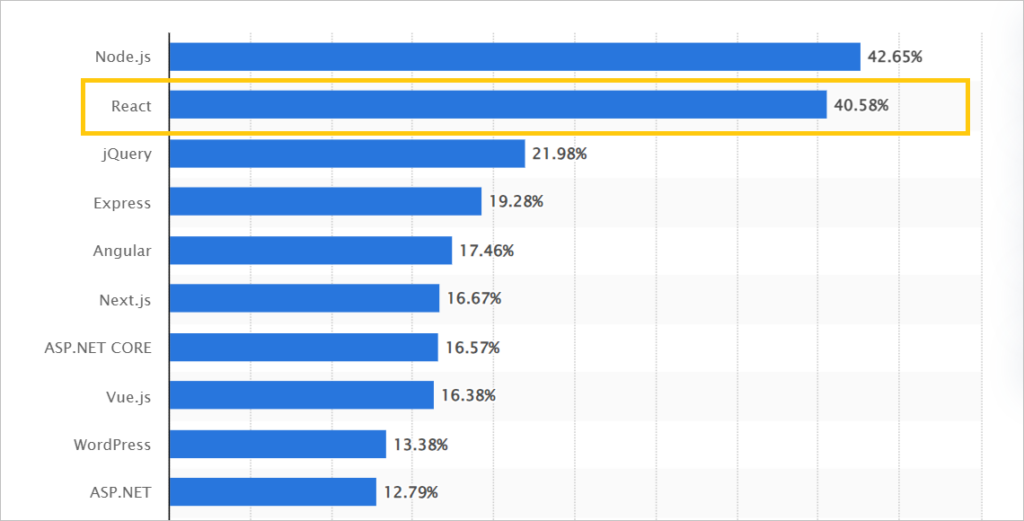
React is the second most used web framework in the world. This JavaScript library helps web developers create rich, efficient front-end designs with less coding.
With over 5 years of experience training 30,000+ students at Codegnan, we believe hands-on training for ReactJS is the best tool to prepare a candidate for real-life challenges. It ensures you can implement theoretical knowledge into projects to solve existing problems.
This guide lists the top React JS projects for beginners and professionals that can help learners develop their skills and land high-quality jobs.
Best part?
We have asked our trainers and mentors to share their project ideas for this guide.
FOUNDER’S NOTE

At codegnan, we have trained more than 30,000 students through our online and classroom training courses. And, one thing we ensure is that every training course is supported by hands-on projects. So, our students can learn by doing practical projects and live case studies.
If you want to learn the React JS training course from Vijayawada, Hyderabad, or Bangalore, contact our team right here.
Also, if you want to access a self-paced course, check out our online React JS course with 37 video lessons.
React JS projects for beginners
1. Create a simple functional college website

Difficulty level: Easy
This project is specifically designed for beginners, where you will create a basic website for your college using ReactJS. The website will provide details for prospective students, faculty, and alumni associations. You can include sections about different academic programs, campus life, important notices, admission details, and contact information.
Learning outcomes:
- ReactJS fundamentals: Beginners will gain a solid understanding of the fundamentals of ReactJS, including its components, state, JSX syntax, event handling, and more complex React applications
- Component-based architecture: You will learn various components of React JS, including headers and footers, navigation bars, and content sections. They will also learn the concept of component-based architecture and its advantages in building modular and reusable user interfaces
- Responsive design: Students will develop skills in creating multiple responsive layouts and designs to adapt the website to different screen sizes and devices, ensuring a user-friendly experience across mobile, tablet and desktop platforms
- Client-side routing: If you want to add more complexity to the project, you can explore using React router for creating multiple pages for different sections of the website, enhancing usability and offering a seamless browsing experience for users
- External libraries and APIs: If you are willing to add extra functionality to your website, you may learn how to integrate external libraries and APIs like fetching data from external sources, implementing third-party components, adding social media widgets, etc.
- Styling: You will gain experience in using CSS for styling your website and make it visually appealing and user-friendly
What it takes to execute this project:
- Set up your React environment: Install Node.js and npm (or yarn) on your computer. Use create-react-app to create a new React project.
- Gather your college information: Collect text, images, and links related to your college’s programs, faculty, student life, and contact details.
- Plan your website structure: Decide on the main sections you want to include, like “About,” “Academics,” “Admissions,” and “Contact.”
- Build React components: Create reusable components for each section of your website to facilitate organisation and future updates.
- Manage website content: Store your college information (text, links, and image URLs) in JavaScript objects or arrays for easy access within your components.
- Display your website content: Render your college information dynamically using React, ensuring a clear and informative layout.
- Style your website (optional): Use CSS to add visual appeal to your website, including colours, fonts, and layouts.
- Routing (optional): To explore further, you can learn how to implement React Router to create separate pages for different sections (e.g., separate pages for each academic program).
Real-world application:
- Displaying vital information: Colleges can use such websites to display vital information and announcements, admission details, campus life, interactive map of the college campus, and contact details
- Develop Alumni relations: An institute can create a simple college website to stay connected with their alumni association, access their directories, update contact information, and allow them to participate in alumni events and reunions.
- Academic resources and research: A College website can be a great place for sharing academic resources like digital repositories, research databases, and scholarly journals. Students can access these platforms to search books, articles and other study materials.
👉 Find the source code for this project
2. Creating a multi-user website blog

Difficulty level: Easy
This project involves building a website where users can create and manage their favourite blog posts. It includes the ability to create, edit, and delete blog posts.
Learning outcomes:
- Knowledge of React JS: Students will get hands-on training on ReactJS fundamentals, including state management, components, props, and more
- Component creation: You can learn to design and implement a blog interface using a component-based architecture, breaking down the UI into reusable React components such as navigation bars, user profiles, and comment sections.
- Data management: Learners will know how to manage data related to blog posts using JavaScript objects or arrays.
- List rendering: You will practice displaying a list of blog entries dynamically using the rendering features of ReactJS.
- Styling: Students will gain experience in styling a blog with CSS to personalise its look and feel.
What it takes to execute this project:
- Set up your React environment: Install Node.js and npm (or yarn) on your computer. Use create-react-app to create a new React project.
- Gather your content: Collect links and information for your favourite articles and websites, or write your own short blog posts.
- Create React components: Build components for individual blog entries, displaying titles, descriptions, and thumbnail images (if available).
- Manage your blog data: Create a system to store your blog content (titles, links, descriptions) using JavaScript objects or arrays.
- Render your blog: Use React’s rendering functionalities to dynamically display your list of blog entries.
- Style your blog (optional): Use CSS to add visual appeal to your blog, including layout, fonts, and colours.
Real-world application:
- Personal Blogging Platforms: You can use these for managing your personal blogs, creating and editing posts, and organising content effectively
- Educational institution: Institutions can implement blog features for students and faculty to share class notes, project updates, research findings and educational content.
- Branding: Companies can use a blog to educate their target consumers on multiple topics and establish themselves as an authority in the market to attract more consumers
👉 Find the source code for this project
3. Build an interactive resume using React JS

Difficulty level: Easy
This project aims to build an interactive resume using ReactJS that allows users to enter their work experience, educational qualifications, skills, and other details. It can also be exported to PDF or printable documents.
Learning outcomes:
- Proficiency in React JS: Students will understand the fundamentals of React JS, including its components, props, state management, and JSX syntax.
- Component-based architecture: You will learn to implement component-based architecture and break down the user interface into reusable and manageable components to design and implement a resume builder interface
- Form handling and validation: While working on the project, you will learn how to implement form handling and validation features, including error handling, input validation, and feedback mechanism
- Dynamic content rendering: You will understand the process of dynamically rendering and updating content on the resume preview based on user input, allowing users to see real-time changes while they fill out the form and customise their resume layout and content.
- Exporting functionality: For complex resume builder projects, he will also learn how to export your resume as a PDF or printable document
What it takes to execute this project:
- Set up your React environment: Install Node.js and npm (or yarn) on your computer. Use create-react-app to create a new React project.
- Design your resume layout: Sketch out the structure of your resume, including sections for your contact information, skills, work experience, and education.
- Build React components: Create reusable components for each section of your resume, allowing for easy editing and organisation.
- Develop forms: Implement forms to capture your resume information like job titles, companies, educational institutions, and skills.
- Manage your resume data: Use React’s state management to keep track of your resume content as you enter it.
- Display your resume: Render your resume information dynamically using React, ensuring a visually appealing and well-structured layout.
- Exporting your resume (optional): You can explore libraries or techniques to export your resume as a PDF or allow for easy printing.
Real-world application:
- Personal use: Users can create their resumes as per the job they are looking for
- Job searching platforms: These platforms can implement a resume builder to help candidates create impressive resumes before applying for a job
- Educational institutions: An institution can use resume builder tools to help the students and alumni create professional resumes
- Freelancer platforms: Such marketplaces often provide resume builders for freelancers to showcase their expertise, skills, and project history helping them secure contracts and project opportunities
Source codes and resources:
👉 Find the source code for this project
React JS projects for intermediate
4. Online appointment booking application

Difficulty level: Medium
This project focuses on building an online booking application that helps users schedule their appointments and manage them online. You will need to create reusable components to display calendars, user forms, and appointment details.
Learning outcomes:
- Building reusable components: You will get a good understanding of creating components that can be used and reused throughout your project and are useful for building complex user interfaces with React
- State management: This project will teach you how to manage different states effectively within the React component, as it requires you to keep track of user selections, appointments, and other user information.
- Data interaction: An online booking system needs to store and retrieve data, so you will learn how to use API or backend services to fetch and store booking information on your system, giving you valuable experience with data handling in React applications
- Conditional rendering: You will understand different conditions and rendering techniques in React by hiding and showing user interface (UI) elements based on user actions, and appointment status.
What it takes to execute this project:
- Set up your React Development Environment: Install Node.js and a code editor like Visual Studio Code. There are many tutorials online to guide you through this.
- Learn React Fundamentals: Before diving in, make sure you have a solid grasp of React JS basics like components, props, state, and lifecycle methods. There are many resources available online, such as the official React documentation https://legacy.reactjs.org/docs/getting-started.html.
- Plan Your Features: Decide on the functionalities you want to include. Start with a basic booking system and gradually add features like user logins, appointment cancellations, and notifications.
- Break it Down: Break down the application into smaller, manageable components. This will make the development process more efficient.
- Test and Refine: Continuously test your application as you build. This will help identify and fix bugs early on.
Real-world application:
- Doctors appointment booking: Hospitals and clinics can use an online booking system to allow patients to book slots with their respective doctors.
- Class registration: Educational institutions can use an online booking system for students to register for respective online classes, which streamlines the registration process and frees up administrative employee time
- Event ticket booking: An online booking system allows event organisers to manage ticket sales and registration for events, conferences, or concerts
- Service booking: Service industry like beauty salons, cosmetologists, dermatologists, dentists, etc., can implement these systems to track customer booking and ensure there is no overlapping of service slots
Source codes and resources:
👉 Find the source code for this project
5. Build an interactive online banking application

Difficulty level: Medium
This project aims to build an interactive online banking application using React JS that will allow users to log in to the system, view account balances, and make simple transactions like deposits or withdrawals.
Learning outcomes:
- Component creation: You’ll break down the application into reusable components like login forms, account displays, and transaction interfaces.
- State management: You’ll use React’s state management features to track user data, such as account information and balances.
- Data fetching (optional): If you choose to implement transactions, you’ll practice fetching data (simulating communication with a bank server) to update account balances.
- User Interface (UI) libraries (optional): You can explore using UI libraries like Bootstrap or Material-UI to style your application and make it visually appealing.
What it takes to execute this project:
- Set up your development environment: Install Node.js and a code editor like Visual Studio Code. You can find resources to set these up online.
- Create a React project: Use tools like Create React App (CRA) to quickly set up the basic project structure.
- Design your components: Sketch out the different screens your application will have (login, account view, transactions). Then, translate those designs into reusable React components.
- Implement functionalities: Focus on core features like login, displaying account information, and (optionally) transactions. Remember, this is a simulation, so data interaction will likely be mocked for learning purposes.
- Style your application (optional): Use CSS or UI libraries to make your application visually appealing and user-friendly.
Real-world application:
- Money transfer: This app can be used to transfer money from one bank account to another smoothly removing the hassle of travelling to banks for money transfers
- Bill payments and mobile recharge: Users can utilise the application for bill payments like credit card bills, utility bills, and recharge their mobile phones from the comfort of their home.
- Cashless shopping: Users can go around shopping without carrying cash and pay at shops using this app, which reduces the chance of losing money on the way or pickpocketing.
👉 Find the source code for this project
6. Online medical shopping system

Difficulty level: Medium
This is a web application that will allow a user to find necessary medicines and purchase them at a set price. It mainly includes features like user authentication, product browsing, shopping cart management, and order processing.
Learning outcomes:
- Component-based architecture: Learners will understand how to break down the application into reusable React components, such as navigation bars, user authentication forms, and product cards.
- State management: They will gain experience in managing application states within ReactJS applications using built-in states and props of React JS, as well as knowledge of external libraries like Redux and Context API.
- Client-side routing: Learners will understand how to implement client-side routing to enable navigation between multiple pages of the application, such as product details, shopping cart, etc.
- API integration: The project will teach students how to fetch data from a backend server with RESTful APIs and handle multiple asynchronous operations to update the application state, such as medical product listing and order processing.
What it takes to execute this project:
- Set up your React environment: Install Node.js and npm (or yarn) on your computer. Use create-react-app to create a new React project.
- Design your user interface (UI): Sketch out the layout of your application, including product listings, product details, and a shopping cart section.
- Build React components: Create reusable components for products, categories, and other UI elements.
- Manage product data: Create a system to store and manage product information (name, description, price, image). This can be done initially with simple JavaScript objects.
- Implement functionalities: Develop features like adding items to the cart, displaying cart contents, and (optionally) a checkout flow (remembering disclaimers about real transactions).
- Style your application (optional): Use CSS to style your application and make it visually appealing.
Real-world application:
- Order medicines online: Users can order their medicines online and get medicines delivered at home.
- Track medical history: To place orders, users need to upload their prescriptions, which allows them to track their medical history.
- Online consultation: Some systems can include online doctor consultation features that help patients meet doctors whenever needed.
- Drug information: These systems contain drug information that gives users an idea about the medicine they are purchasing.
- Medicine reminders: People often forget to shop for medicines on time, and these systems can remind users when to buy medicines.
👉 Find the source code for this project
React JS projects for final-year students
7. Hospital management system

Difficulty level: Hard
This project helps learners create software that helps hospitals run their operations smoothly, including patient management, appointment scheduling, inventory management, staff management, billing, reporting and analytics
Learning outcomes:
- Data handling and manipulation: Learners will gain an understanding of data handling with hospital management systems as they work with patient data, appointment information, and staff records or more. They will also learn how to implement libraries like Redux and Context API to handle complex data flows in interactions between multiple parts of the application.
- Component design and structure: This project involves building reusable components for multiple functionalities like creating appointment forms, doctor profiles, and patient dashboards. So you will learn how to create these functionalities and improve your ability to design a well-structured React application
- Routing: You will need to implement different functionalities for multiple user roles, which requires knowledge of React routing to manage navigation between different sections of the application. You will also learn how to use authentication libraries to restrict access based on user roles.
- State management: Learners will gain an understanding of how to effectively handle dynamic data, user interactions, and complex workflows using the in-built state management features of React.
What it takes to execute this project:
- Set up your React environment: Install Node.js and npm (or yarn) on your computer. Use create-react-app to create a new React project.
- Plan your functionalities: Decide on the core functionalities you want to include, like patient registration, appointment scheduling (consider disclaimers about real bookings), and patient information display.
- Design user interfaces (UIs): Sketch out separate UIs for patients and potentially doctors (if including appointment scheduling).
- Build React components: Create advanced and reusable components for forms, data displays, and potentially doctor dashboards.
- Manage patient data: Implement a system to store and manage patient information securely (remember, this is a learning project, not a real system). You can explore solutions like Redux or Context API for complex data management.
- Develop functionalities: Based on your plan, create functionalities like patient registration forms, displaying patient information (with disclaimers), and potentially appointment scheduling (again, with disclaimers).
- Routing and user authentication (optional): If you want to push your skills, explore React Router to create separate interfaces for patients and doctors and potentially implement basic user login functionalities.
- Fetching data (optional): As an advanced step, delve into fetching data from a backend server (potentially using an API) to simulate real-time information retrieval (e.g., doctor appointments).
Real-world application:
- Patient management: Hospitals and clinics use this system to manage patient records, including medical history, diagnosis, treatment plans, and medications. The system can help institutes with efficient patient registration, admission, discharge, transfer processes, and more to streamline patient care and improve workflow efficiency.
- Appointment scheduling: This project helps patients to schedule and manage patient appointments for consultations, surgeries, diagnostic tests, and other procedures. It allows users to check appointment availability, send reminders to patients, and manage appointment calendars for medical professionals.
- Healthcare inventory management: This project will allow healthcare management to keep track of its inventory and supplies of medical equipment, pharmaceuticals, and other healthcare products. The system can track inventory levels, generate purchase orders, and ensure adequate amounts of medical supply availability.
👉 Find the source code for this project
8. Building a clone page of the Paytm payment platform

Difficulty level: Hard
This project will guide learners to build a simplified version of the Paytm payment platform using ReactJS. It will focus on building a clone of the UI layout and functionality for basic features like money transfers, bill payments, and mobile recharge.
Learning outcomes:
- Component Creation: Build reusable React components for different sections of the Paytm UI, like the header, navigation bar, service tiles, and forms.
- State Management: Manage user interactions like inputting recharge amount or selecting a bill category using React’s state management features.
- Conditional Rendering: Conditionally display different UI elements based on user actions, like showing specific recharge options for a chosen mobile provider.
- API Integration: Students will integrate backend APIs or mock APIs to fetch and display data such as product listings, pricing, and user information, simulating the functionality of the original Paytm website and familiarising themselves with asynchronous data fetching and handling in React.
- User Authentication and Authorization: They may implement user authentication and authorisation features to simulate user login, registration, and account management functionalities, providing a personalised experience and ensuring secure access to user-specific data and features.
- Form Handling and Validation: Students will gain experience in implementing form handling and validation features, including input validation, error handling, and feedback mechanisms for forms such as the payment form, ensuring data integrity and user-friendly interactions.
- Styling with CSS: Apply CSS to style your components and achieve Paytm’s visual look and feel.
What it takes to execute this project:
- Set up your development environment: You’ll need Node.js and npm (or yarn) installed on your computer. Several tools like Create React App can help you quickly set up a React project.
- Design the UI: Sketch out the different screens and functionalities you want to include in your Paytm clone. This helps visualise the component structure.
- Build React Components: Start coding reusable components for various UI elements like the header, navigation, service cards, and input forms.
- Implement State Management: Use React’s state management features like useState or Redux (if comfortable) to handle user interactions with the app.
- Style with CSS: Apply CSS styles to your components to achieve the desired visual design that resembles the Paytm app.
Real-world application:
- Build a payment app: This project will teach you how to build a payment app similar to Paytm that allows smooth money transfers
- Experimentation purposes: This Paytm clone page creation project can be used for experiment with new features in the fintech industry
👉 Find the source code for this project
9. Building a personal portfolio website
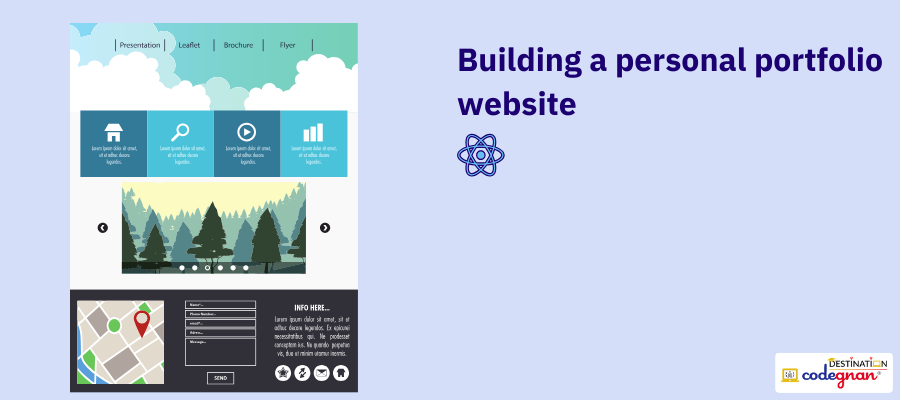
Difficulty level: Hard
This project is about creating a personal portfolio website using ReactJS where you can showcase your skills, expertise, experience, and project history to potential customers, employers, or partners.
Learning outcomes:
- Component Creation: You’ll break down your portfolio into reusable React components like “About Me,” “Skills,” and “Projects.”
- Styling with CSS: Learn how to style your components using CSS to create a unique and professional look for your portfolio.
- Data Management: Explore ways to manage your project information and details within React components.
- Interactive Features: You can add interactive elements like carousels for project images or a contact form for visitors to reach you.
- State Management: Through managing application state within the portfolio page, students will understand how to handle dynamic content, user interactions, and navigation transitions effectively using React’s state management features.
- Routing: Students will implement client-side routing using React Router to enable navigation between different sections of the portfolio website, such as projects, about me, resume, and contact pages, providing a seamless and intuitive user experience.
What it takes to execute this project:
Set up your Development Environment:
- Install Node.js and a code editor like Visual Studio Code.
- Use create-react-app to create a new React project.
Build your Portfolio Components:
- Create separate React components for different sections of your portfolio (About, Skills, Projects, etc.).
- Focus on clear structure and informative content within each component.
Style your Portfolio:
- Use CSS to style your components and create a visually appealing layout.
- Explore online resources or pre-built themes for inspiration.
(Optional) Add Functionality:
- Implement features like carousels for displaying project images, or a contact form for visitors to reach you.
- Consider using external libraries for functionalities like animations or forms.
Deploy your Portfolio:
Use services like Netlify or Vercel to host your React application online and share your portfolio with the world!
Real-world application:
- Job searching and career development: This portfolio page will showcase your skills, expertise, and achievements, helping you land a job or attract clients.
- Networking and personal branding: You can use this portfolio page to expand your network and showcase your skills and contributions in the domain to establish yourself as an authority for personal branding.
- Pitching: This page will allow you to showcase business products and services while pitching for investment and effectively communicate your value proposition and startup potential to reach higher limits.
👉 Find the source code for this project
React JS projects with source code
10. Life Line – A Health Assistance Web Application
Life Line is a health assistance web application created with ReactJS that offers multiple health-related features like a symptom checker, health information library, vitals checker, appointment management, etc. You can also add complex features like personalised health tips or integration with wearable devices. For the project, you need knowledge of HTML & CSS, JavaScript, a solid grasp of React concepts, use of APIs, and React developer tools.
👉 Find the source code for this project
11. Online auction application
This project is for learners with intermediary skills where you create an application for online auctioning of goods. Users can browse for items up for auction, view details and images, and participate in real-time bidding. It requires basic knowledge of HTML, CSS, and JavaScript, a solid grasp of ReactJS (including component architecture, state management, and event handling), experience with UI library (Bootstrap or Material UI), node.js and npm, and real-time communication library (like Socket.IO). This app can be used by local communities or charities to host online bidding programs.
👉 Find the source code for this project
12. Building calculator
This is a beginner-friendly ReactJS project that aims to create a simple calculator which can handle user input, perform easy arithmetic operations, and display real-time results. The project will give you knowledge about state management and event handling in React, as well as how to create dynamic user interfaces. It requires having basic knowledge of HTML, CSS, and JavaScript, an understanding of mathematical operations, and practice using npm or yarn, IDE or text editor, and Bootstrap or Material UI.
👉 Find the source code for this project
13. Creating weather app
This project will help you build a weather app that displays real-time weather information according to your location. To build the app, you must have knowledge of basic HTML, CSS, & JavaScript, and an understanding of API & JSON. You will also use React, npm (Node Package Manager) or yarn (Alternative package manager), OpenWeatherMap API, Axios, IDE or text editor, and Bootstrap for styling.
👉 Find the source code for this project
14. Building a stopwatch
It is another beginner-friendly ReactJS project that creates a stopwatch measuring elapsed time. You can implement your knowledge of state management and event handling of ReactJS in this project. However, before you start building a stopwatch make sure you have knowledge in HTML, CSS, and JavaScript, use of IDE, Bootstrap, and npm (Node Package Manager).
👉 Find the source code for this project
15. Video call app
This is an advanced ReactJS project that aims at building a video calling app with basic features like screen sharing, chat, and call recording. It requires proficiency in React, HTML, CSS, JavaScript, and knowledge of WebRTC (Web Real-Time Communication) technology, media servers, NAT traversal, and signalling protocols. There are multiple other things you need to know before developing such an app.
👉 Find the source code for this project
Execute React JS projects with expert ReactJS mentors at codegnan
At Codegnan, you will learn ReactJS under the mentorship of Ravi Siva Ram Teja Nagulavancha, an IT professional with 4+ years of experience in this domain and teaching thousands of students on frontend and backend technologies. Learners will get good exposure to ReactJS live projects under his mentorship designed for beginners to professionals at Codegnan that sharpens their skills and makes them job-ready.
By the end of every module, learners can implement their theoretical knowledge into projects. This allows them to understand clearly what they have learned and how it works in real-life projects. Upon successful completion, students will receive an industry-recognised certification that proves their abilities.
Benefits of doing React JS projects for students
1. Hands-on experience with ReactJS
Having theoretical knowledge is not sufficient for students enrolling on ReactJS programs. They need to acquire hands-on training to apply that knowledge to real-time projects. This not only clears all their doubts but also develops their practical skills. Additionally, while doing these projects, students will encounter multiple problems that they can solve under mentor guidance and develop a good grasp of ReactJS.
2. Build your professional portfolio
Learners can add these projects or showcase their skills in developing a simple ReactJS application. You can add your difficulties and achievements in completing the project that can set you apart from the competition. This will improve their professional portfolio, allowing them to land a job as per their quality and abilities. Also, if you want to start as a freelancer, your projects are the social proof of your abilities, and you can attract more clients.
3. Improve creative skills
Once you start doing a project, you can put your ideas into codes that will create unique and visually appealing user interfaces. It will create interest among students in implementing additional features and design elements to create an easy-to-use application for users.
4. Enter into the professional network
Students usually learn ReactJS projects under experts or mentors. If they can finish up projects smoothly or mentors find them extraordinary, they can connect students with other people within their network. This opens up the door to better opportunities and land a job in top companies.
👉 Find related Python projects for beginners.
Become a React JS expert in the next 30 days with codegnan
Codegnan offers a 30-day ReactJS program for learners who want to start their career in the software development industry in 2024. This program comprises multiple modules covering the basic knowledge of ReactJS, and to implement your theoretical knowledge, Codegnan experts conduct live projects. ReactJS offline classes are available at Vijayawada, and everyone globally can opt for their online classes.
The ReactJS course fee is ₹7,999, available for a limited period. Learn more about ReactJS classroom training facilities in Vijayawada, and download the brochure for more information.
You can attend the live interactive ReactJS classes by Codegnan conducted by experienced trainers. They also provide doubt-clearing sessions to ensure you can understand every topic and implement them into real-world projects.
You can also enrol in their Job Accelerator Program, which is a 100-day training program conducted by Codegnan experts. You can get a 4-month internship letter on successful completion of this program. Thus, it can be a stepping stone for greater opportunities in future.
Sairam Uppugundla is the CEO and founder of Codegnan IT Solutions. With a strong background in Computer Science and over 10 years of experience, he is committed to bridging the gap between academia and industry.
Sairam Uppugundla’s expertise spans Python, Software Development, Data Analysis, AWS, Big Data, Machine Learning, Natural Language Processing (NLP) and more.
He previously worked as a Board Of Studies Member at PB Siddhartha College of Arts and Science. With expertise in data science, he was involved in designing the Curriculum for the BSc data Science Branch. Also, he worked as a Data Science consultant for Andhra Pradesh State Skill Development Corporation (APSSDC).


